Clients can see moving visuals in animations rather than rendering, which only gives static pictures.
Renderings are the images that can hide many technical points, leaving designers and their clients in the dark, and these guesses can lead to a bundle of issues later, such as structural and engineering clashes, incorrect spatial scaling, cost overruns, and waste of time. It is where 3D interior designing steps next to rendering, as it brings designs to life through motion. Continue reading to explore details on this next-level visualization approach.
What is Meant by 3D Interior Animation?
It is a method that converts static objects into moving ones by utilizing advanced interior BIM modeling services to ground the digital space in real-world dimensions. It is like a virtual camera that shows the finished design in real-time, covering material texture, paint shade, furniture placement, and lighting. Unlike a single picture that hides many things, an animation tells a full story of how the space will function after construction.
What are the Major Types of 3D Interior Animation?
3D Walkthrough Animation
This is the workhorse of interior visualization. The camera moves through the space at human eye level, almost exactly how you’d experience it if you walked in the door. You go through the entrance, turn a corner, see the kitchen, and scan the living room.
This means there is no need to read floor plans or interpret isometric views. Just watch and feel the space.
There are some points designers can get wrong here.
- Don’t let the camera move too fast. A 60–90 second walkthrough is usually plenty. Slow, deliberate pacing with smooth easing (ease-in/out on every cut) makes the space feel generous. If you rush it, you’ll lose the emotional impact entirely.
- Also, ensure the right eye level: 150–165cm camera height, not 180cm. Why? Because you want the viewer to feel like they’re in the room, not floating above it.
Best for: Residential sales, hospitality design, showroom presentations and real estate listings.
3D Flythrough Animation
Flythrough lifts the camera and lets it glide through the space from a higher vantage point, often starting outside, pulling through a roofline, and descending into the interior. It communicates spatial relationships in a way that walkthroughs simply can’t.
Consider a large hotel lobby or an open-plan commercial floor. If you try to walk through that, you’ll never convey how the reception connects to the lounge, which connects to the dining terrace. A flythrough clears the whole layout in 10 seconds.
Like the first type, there are also some traps for designers:
- Never treat a fly-through like just a fast walkthrough. Your camera paths should be arcing and sweeping with smooth S-curves, gentle spirals, and not just a horizontal line moved upward.
- Use depth of field to anchor the viewer to whatever zone you’re flying through.
Best for: Commercial interiors, large residential developments, master plans and planning approvals.
Panoramic (360°) & VR-Ready Animations
This is where 3D visualization starts crossing into immersive tech. A 360° panorama renders the entire scene in a spherical projection. This means the viewer can drag left/right/up/down and explore the room freely. VR-ready output takes this further, leveraging immersive VR and AR services to create the file for headsets like Meta Quest or Apple Vision Pro.
For client presentations, this is increasingly the format that wins deals. Furthermore, it gives reviewers genuine spatial confidence as they can look up at the ceiling detail or down at the floor pattern without relying on someone else’s camera path.
The negative sides of this type of 3D interior animation include:
- Unlike walkthrough/flythrough, you’re rendering the full 6,000px equirectangular image for every frame. Render times increase considerably. For static 360 stills, estimate at least 2–3 hours per shot on a mid-tier workstation.
Best for: VR showrooms, luxury real estate, hospitality pre-sales, and client sign-off meetings.
Cinematic/Emotional Interior Videos
This is the most ambitious type on the list. Cinematic videos aren’t just well-rendered walkthroughs. They’re stories. Consider morning light pouring through curtains, steam rising from a coffee cup, a child’s drawing on a fridge. The camera work references real cinematography, including rack focus pulls, dolly shots and golden hour lighting.
The goal isn’t to show the space. It’s to sell a feeling. A luxury apartment developer doesn’t just want buyers to see the kitchen; they want them to want to cook there. And that’s what cinematic interior videos bring.
Points to be focused here include:
- A shot list planned before you touch 3D software, reference film boards, a proper audio score, and color grading in post.
- Budget double what you’d spend on a walkthrough, minimum.
Best for: Luxury residential marketing, hospitality brands, interior design studio reels and award submissions.
Sun Study Animations
Much like time-based 4D BIM simulation services map out construction sequences over time, sun studies animation simulates how natural light moves through the interior over the course of a day or across seasons. You can watch shadows shift, bright zones migrate, and dark corners reveal themselves.
It’s genuinely functional data. Architects use it to verify light penetration to WELL or LEED standards. Designers use it to decide where to place workspaces versus storage walls. And clients use it to understand why that south-facing bedroom is warmer in winter. This means it is useful for everyone.
Take care of the following points here:
- In most 3D software like 3ds Max, Cinema 4D, and Enscape, first input the GPS coordinates and building orientation, then animate the sun controller across a 24-hour or 12-month range. The output is usually a time-lapse loop, often 30–60 seconds long.
Best for: Passive design certification, technical client reviews, energy analysis presentations and workspace planning.
Explainer/Dynamic Object Animations
This type is all about revealing how things work. The camera might pull apart a wall assembly to show insulation layers, or animate how modular furniture reconfigures, or show a sliding partition opening and closing to demonstrate the flexibility of a space.
It’s heavily used in product-integrated interiors; for example, kitchen brand showrooms explaining how their cabinet mechanisms work, or a prefab housing company showing how
Their modular panels stack and connect.
Keep an eye on some design principles here:
- Every camera move should serve the explanation. If you’re revealing a component, the camera should move in tight on that component right before it animates. Timing between camera position and object animation is everything. If you offset them, you’ll confuse the viewer. So, align them precisely.
Best for: Product presentations, technical documentation, construction sequence visualization, fit-out pitches.
How Does 3D Walkthrough Animation Differ from Traditional Rendering?
After the 1960s and before the 1990s, rendering was in the limelight in the world of designers, architects, and engineers. Between the 1990s and 2010s, they shifted to architectural flythoughts. Here, a question arises: Why did they shift from rendering to animation? Actually, for better design understanding and control, a shift detailed in our guide, Beyond the Model: How Integrating Construction Technology with BIM Eliminates Rework and Maximizes ROI, which explores reducing the rework cost and waste of time.
You can better understand the 3D interior animation vs traditional renderings in the table below.
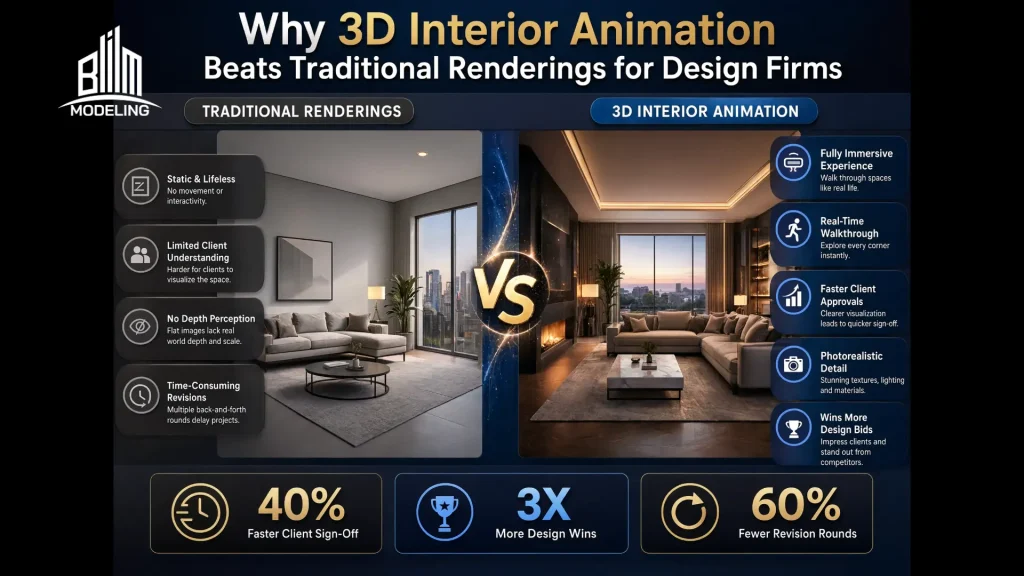
| Aspect | Traditional Renderings | 3D Interior Animation | Winner for Most Projects |
| Realism | Great detail in one view | High detail plus movement and changing light | Animation |
| Client Understanding | Good for specific details | Excellent for overall spatial experience | Animation |
| Approval Speed | Moderate – multiple revisions needed | Faster – clients grasp concepts more quickly | Animation |
| Marketing Impact | Strong for print and static web | Powerful for video, social, VR experiences | Animation |
| Design Revisions | Easy to update single images | More involved but reveals issues earlier | Renderings (early stage) |
Simply put, static images excel when you need to focus on material samples or specific lighting setups. They remain faster and cheaper to produce for initial concepts. Yet they struggle to convey scale, flow, and atmosphere fully. Animation bridges that gap effectively.
Therefore, many firms now rely on 3D interior visualization services that deliver both. They create a core model once, then generate both stills and animations from it. This approach proves efficient in today’s cost-conscious environment.
Is 3D Interior Animation Better than Rendering?
Yes, in many situations,3D interior animation delivers superior results. It excels when understanding movement, flow, and emotional atmosphere matters most. Complex projects with multiple stakeholders benefit hugely from the added clarity.
And static rendering remains enough for early concept stages, material selection, or when budget constraints are tight. Simple projects or specific detail shots don’t always need full animation.
The Combined Force of Both, Rendering and Animation
The smartest approach combines both. Use 3D architectural modeling services to build a strong base model. Generate static renderings for detailed reviews and marketing stills. Then create targeted animations for key client presentations and sales materials. This hybrid method gives maximum flexibility while controlling costs.
Get precise modeling and compelling animations you need to stand out!
Contact UsNote: In 2026, with economic pressures from international conflicts affecting supply chains and material prices, choosing tools that reduce revisions and speed approvals makes sound business sense.
Which Construction Projects Can Benefit from 3D Animation?
● Residential Projects
Residential interior contractors benefit from 3D animations. As homebuyers want to feel the warmth of a living room or the efficiency of a kitchen layout, animation lets them experience morning light in the breakfast nook or evening ambiance in the entertainment area. Additionally, furniture rendering helps showcase how pieces fit harmoniously within the space.
● Commercial Projects
Commercial contractors use animation to demonstrate workplace culture and efficiency. Companies see how collaborative zones flow into focus areas. This proves invaluable when pitching to corporate clients who need to visualize their team’s daily experience.
● Hospitality Projects
You can make hospitality projects shine with animation. Hotels and restaurants sell atmosphere as much as physical spaces. Seeing guests move through lobbies, experience dining flows, or relax in suites creates powerful marketing tools. It is where experts use 3D floor plan design services to get the foundation, while full animation brings the guest journey to life.
● Real Estate Projects
Real estate marketing has transformed. Instead of flat brochures, developers offer immersive virtual tours. This approach helps sell properties before construction finishes, improving cash flow and reducing risk.
Why Designing Firms Use 3D Interior Animation?
They use 3D interior animations for the following benefits:
Better Visualization and Realism
When you walk someone through a 3D animated interior, they’re not interpreting a drawing; however, they’re experiencing a space. They see morning light falling across the floor. They feel how the living room opens into the dining area. And they notice the warmth of the materials without anyone explaining them. That instinctive, emotional understanding is what closes decisions, reduces revisions, and builds genuine trust in your design.
Faster Client Approvals
Clients approve designs faster when they understand them deeply. Animation reduces repeating questions. Clients grasp spatial relationships instantly instead of trying to mentally connect multiple static views together. And in uncertain economic times with fluctuating costs, faster approvals mean projects stay on budget and schedule more reliably.
Improved Communication
Design teams, clients, contractors, and planners mostly speak different languages for the same concept. And this can lead to many confusions. Animation creates a common visual reference that everyone understands.
This means no more explaining, “you enter here and turn left,” as the camera shows the exact path. Similarly, interior designers can demonstrate how furniture arrangements affect movement and conversation flow. Planners see how public areas connect with private zones. This shared understanding cuts down miscommunication dramatically and keeps the project on track.
Strong Marketing and Sales Impact
Animation gives marketing teams something static renders never could: a story. A well-crafted walkthrough doesn’t just show a property, it makes someone picture their life inside it. That emotional pull is what drives inquiries, shortens sales cycles, and justifies premium pricing. On social media, motion stops the scroll where images don’t. For remote buyers, a cinematic virtual tour replaces the site visit entirely, and often works better. In a competitive market, it’s the difference between being remembered and being skipped.
Interactive Experience Feel
There’s a fundamental difference between watching a space and moving through it on your own terms. When someone can pause, look around, change their angle, or slip on a headset and actually stand in a room that doesn’t exist yet, something shifts. It stops feeling like a presentation and starts feeling like a preview of reality.
That sense of control builds confidence in a way no guided walkthrough can replicate. Clients who explore a space interactively ask fewer anxious questions, second-guess less, and sign off faster.
The Comprehensive 3D Interior Animation Workflow
Stage 1: The Brief
Before a single polygon is modeled, you sit down with the client and extract everything you need, including:
- Floor plans
- Elevations
- Material schedules
- Reference images
- Mood boards
And the questions that arise at this stage aren’t technical, they’re directorial, like,
- What should this space make someone feel?
- Who is the audience watching this?
- What decision are we trying to help them make?
Most animators skip those questions entirely and jump straight to software. Therefore, so much animation work is technically solid but emotionally empty. Simply put, a beautifully lit room that makes nobody feel anything is a wasted opportunity.
Therefore, getting the brief here is essential; otherwise, you will experience a lot of revisions.
Stage 2: Pre-Production
At this stage, teams build the blueprint for everything that follows.
- Shot List and Storyboard: Decide which rooms get covered, in what order, and from what angles. Sketch the camera path, even rough thumbnails on paper. This forces you to think about the animation as an experience rather than a series of random moves.
- Gather References. Pull cinematic references, lighting references, and material references. Get answers to questions like “What films use similar lighting moods?”, and “What real interiors have the spatial quality you’re trying to recreate?”
- Plan Asset: Identify what geometry you’ll model from scratch, what you’ll source from libraries, and what needs custom work. A thorough asset list prevents the panic of realizing mid-project that you have no decent 3D furniture for a specific era or style.
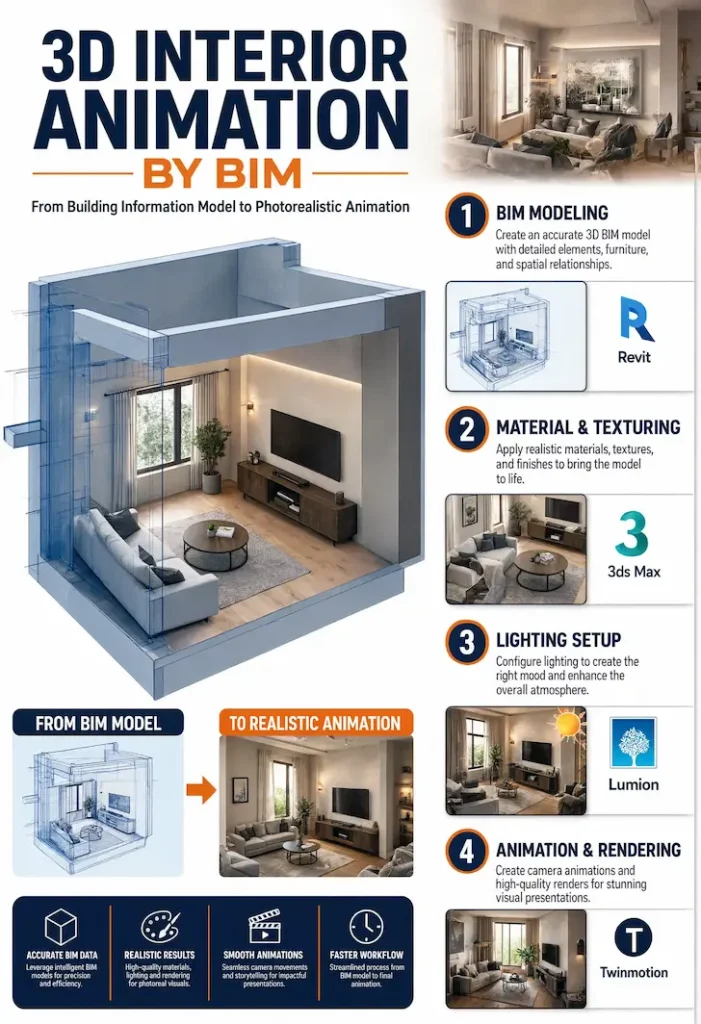
Stage 3: Modeling and Scene Assembly
Architecture comes first, which means playing with walls, floors, ceilings and openings. Everything goes on at a real-world scale, because the wrong scale is the kind of mistake that doesn’t announce itself immediately. It creeps up on you at the lighting stage when something feels off, and you spend hours chasing a problem that was baked in from the start.
Furniture and props come next. Every object has to earn its place in the frame. Too sparse means the space will feel cold and unlived-in. Similarly, too cluttered means that the camera has nowhere to rest. Simply put, getting that balance right is a genuine design instinct.
Above all, keep the scene organized. Ensure named layers, logical grouping, and consistent file structure. If you ignore this, it will cost you significant money and time in the form of revelations.
Stage 4: Materials and Texturing
It is where you have to define how every surface interacts with light, which means how much it absorbs, how much it reflects, whether it’s smooth or rough, matte or glossy.
The technical side is PBR (Physically Based Rendering) material workflows that deal with roughness maps, normal maps, and displacement. But the craft side is understanding real materials. Concrete doesn’t reflect the same way marble does. Similarly, linen catches light differently from velvet. Therefore, you need to have looked at real materials and internalized how they behave.
Note: UV unwrapping matters here. A texture map that tiles awkwardly on a floor or stretches on a curved surface immediately reads as fake. Clients can’t articulate why it looks wrong. They just know it does.
Stage 5: Lighting
Lighting is the soul of interior animation. It only gives modest, convincing geometry looks when you get it right. And as a designer, you have to play with multiple light sources at once, which includes:
- Natural light pouring through windows
- Artificial fixtures using IES profiles pulled from real manufacturer data
- The quiet bounce light that fills the shadows and ties everything together
Remember that none of these works in isolation. They have to feel like they belong to the same world. And this process is never a straight line. You have to set up a rough pass, fire a low-quality test render, squint at it, adjust, and go again.
Note: It will take longer than you planned. It always does — and rushing it is always the wrong call, because lighting is the one thing viewers feel before they consciously notice anything else.
Stage 6: Camera Animation
The major mistakes here:
- Easing curves by setting all at once
- Linear movements
- Lifeless video
Never consider a camera as a recording device. Take it as a human because every motion needs to breathe. This means building speed gradually, settling with intention, the way a person actually moves through a room they’re genuinely experiencing.
When turning at a corner, it should lead slightly, the way your head moves before your shoulders follow. Similarly, when slowing down to rest on something worth noticing, like a texture, a corner styled just right, or afternoon light hitting a wall, that pause must feel chosen, not accidental. These adjustments will add feel to the animation, and that’s what your clients need.
Pro Tip: Before you press the render button, do a playblast, which is a quick, low-resolution preview, played back at full speed, in one sitting. This will help you catch more timing issues like an expert.
Stage 7: Rendering
Now comes the physics game. At this stage, every frame renders on its own, including light rays traced across the scene, bouncing between surfaces, calculated thousands of times per pixel until the image settles into something that feels real. There’s no creative decision left to make here. What you’re managing at this point is a balancing act between quality and time, and the currency you’re spending is noise.
Every render has grain. The question is how much you’re willing to tolerate and how long you’re willing to wait to get rid of it. Pushing your sample count higher cleans up the image, but increases the time. This is where AI-based denoising changes the game; modern machine-learning denoisers let you run lower sample counts and still get a clean result.
Note: To see how these technologies are changing layouts, read about AI-Driven Modeling for Interior Architecture: Optimize Design Accuracy & Project ROI to streamline your rendering workflows.
The Math of Rendering
Total Render Time = Time Per Frame x Total Frames
Frame Count Calculation
A 60-second animation at 24fps is 1,440 frames.
Time Estimate
At 10 minutes per frame on a mid-range workstation, that’s 240 hours of continuous rendering. Nearly 10 days of your machine doing nothing else.
Note: Before you commit a single frame to render, build your passes out separately—beauty, shadow, reflection, ambient occlusion, each one its own layer. Otherwise, you will have to re-render, which costs both money and time.
Stage 8: Post-Production
Raw renders never go straight to the client. You have to grade, compose, and finish them first. Color grading is where the emotional tone gets integrated. Warm grades are added for cozy residential spaces, while cooler, desaturated tones are included for contemporary commercial interiors that align with what are the characteristics of modern design.
Furthermore, experts add lens effects at this stage, which means a touch of bloom around light sources, subtle (slight, delicate, and not immediately obvious or harsh) chromatic aberration at the frame edges, and a gentle vignette.
Then comes audio, which is a score or ambient sound design that matches the visual mood. It sounds useless; to know its value, consider watching any cinematic interior video on mute; you’ll immediately feel something is missing. And last, the final output gets encoded to H.264 or ProRes, depending on delivery formats like web, presentation, or broadcast.
Stage 9: Review and Revision
Now, it is time to send the set to the client with context. Never just drop a link; always mention what they’re looking at and what kind of feedback would be helpful here. And in feedback, make sure they are complete. You can see the difference between “it doesn’t feel right” and “the kitchen lighting feels too cold”.
Plus, build a revision round into your contract from the start. Define what constitutes a revision versus a new brief. This conversation is much easier to have before the work starts than after.
Stage 10: Delivery
Last, deliver the final files at the agreed specifications, meaning resolution, format, frame rate, and color space. Include the raw render sequences since the client might need future edits. Also, archive the scene file, because 10 months later, someone can ask for a small change, and by having the scene files, you will be at ease because of good organization.
What are the Core Technicalities in 3D Interior Animation?
● Modeling & Scene Setup
You understand that everything starts with geometry. Sloppy modeling causes render artifacts and slows down every step that follows. For good outcomes, your 3D model must be clean, which means no overlapping faces, correct scale, and proper object naming conventions.
Pro Tip: Model furniture, architecture, and props separately and assemble in a scene file.
● Materials & Texturing
As already mentioned, every surface needs a physically-based material (PBR). This means defining roughness, reflectivity, metalness, and sometimes subsurface scattering for fabrics, skin, and translucent materials. Plus, texture maps need correct UV unwrapping to set properly on geometry.
● Lighting Setup
It is the most technically demanding part. Interior lighting involves a combination of HDRI environment maps for ambient light, IES photometric profiles for artificial lights, and careful bounce light management. You can use Global illumination algorithms to calculate how light bounces between surfaces, making renders feel real.
● Camera Animation & Rigging
Camera movement is animated using keyframes on position, rotation, and focal length. Smooth motion requires proper easing curves. Remember that linear keyframes produce robotic, uncomfortable movement; so avoid that. It is where many animators use a camera rig with a target object so the camera always tracks naturally.
Pro Tip: Keep the frame rate 24fps (cinematic) or 30fps (commercial/digital).
● Render Engine Selection
The render engine determines quality, speed, and workflow. Common choices include V-Ray, Corona, Arnold, Enscape, Lumion, and Twinmotion. Choosing the right engine depends on deadline, hardware, and the level of realism required.
● Render Settings & Output
Resolution, sample count, and denoising settings directly affect quality and render time. A 1920×1080 frame at high sample count can take minutes per frame (as calculated above). You can use render farms for large projects.
Note: Output is typically EXR or PNG sequences, not direct video files.
● Post-Production & Compositing
You know that raw renders go through color grading, contrast adjustments, lens effects, and motion blur in compositing software like After Effects or DaVinci Resolve. This is where the final look is locked. Audio scoring and sound design are added here for cinematic pieces, which are both complicated and time-consuming.
● File Management & Pipeline
Large animation projects generate hundreds of gigabytes of data with texture libraries, scene files, render passes, and output sequences. A disciplined folder structure, version control, and asset linking conventions are non-negotiable on professional projects, and they should be well-controlled and managed.
How to Handle the 3D Interior Animation Technicalities?
Mastering every technical layer of 3D interior animation takes years. Most design firms don’t have that time. Outsourcing to specialist visualization experts will let you skip the learning curve entirely; you will bring the design vision, they will handle the technical execution, and the final output will reflect both at their best.
Conclusion
3D interior animation offers design firms clear advantages in visualization, communication, and marketing. It helps clients understand spaces more deeply than static images ever could. With the integration of this approach, one can make projects move forward faster with fewer expensive revisions.
The industry continues evolving in 2026. Firms that benefit from dynamic visualization tools position themselves strongly despite economic challenges. They deliver better client experiences and more successful projects. And you can achieve this too by outsourcing services to industry experts.
BIM Modeling stands out from other companies in the US. Leveraging 20+ years of experience, industry knowledge, and current market trends, the team provides visualizations that not only help you impress your clients but also ensure nice designs that reduce the project cost and increase your margin.
FAQs
What are the limits of rendering?
Static renderings freeze a space in one moment, which means no movement, no flow, and no sense of scale. That means clients can misread depth, struggle to feel spatial connections, and often approve designs they haven’t truly understood. And ultimately, this is followed by the endless chain of revisions.
Where does rendering make sense?
Renderings work best in early concept stages, material close-ups, budget-constrained projects, and quick internal reviews.
Why is there a need for render farms?
Instead of one machine working through 1,440 frames in sequence, you can distribute that load across dozens or hundreds of networked machines simultaneously, pulling a week of render time down to a matter of hours.
How long does it take to create a professional animation?
Simple walkthroughs can take a few weeks. However, complex projects with detailed environments require more time.
Will animation replace static renderings completely?
No. Both tools serve different purposes effectively. Many designing firms use them together as complementary assets.
How to choose the best 3D interior animator?
Review their portfolio for style range and realism, check client reviews, ask about software and render pipelines, confirm revision policies, and assess communication speed. A great animator understands design intent, not just technical execution.
